Recipe Index

Showing posts with label Bread. Show all posts

Friday, November 19, 2021

Pork Bread with Fresh Cream

Having lived most of my early life in South East Asia, I was pampered with varieties of good food. One of my favorite snacks is Asian type sweet soft bread filled with varieties of filling. The filling can be sweet or salty. 

One of my sweet childhood memories is when my parents brought me to buy baked filled bread from Teck Kee Tanglin Pau. I loved the smell of the freshly baked bread, the taste of sweet meat filling of the bread and the trips to the shop with my parents. 

Although we lived in other continent now, we also introduce our kids to varieties of food, including Asian food and snacks. The baked bread filled with sweet meat has also become one of the children favorite snacks or to-go-lunch options. I sometimes fill their lunch box with this type of bread. 

Usually, I used tangzhong bread recipe to make this bread. However, I felt that it was sometimes quite troublesome to prepare the tangzhong in advance. Therefore, I searched the internet for the possible replacement for the tangzhong. An idea for that is using either sour cream or fresh cream with minimal 25% fat content. I saw some bread recipe in the internet using either sour cream or other thick cream.

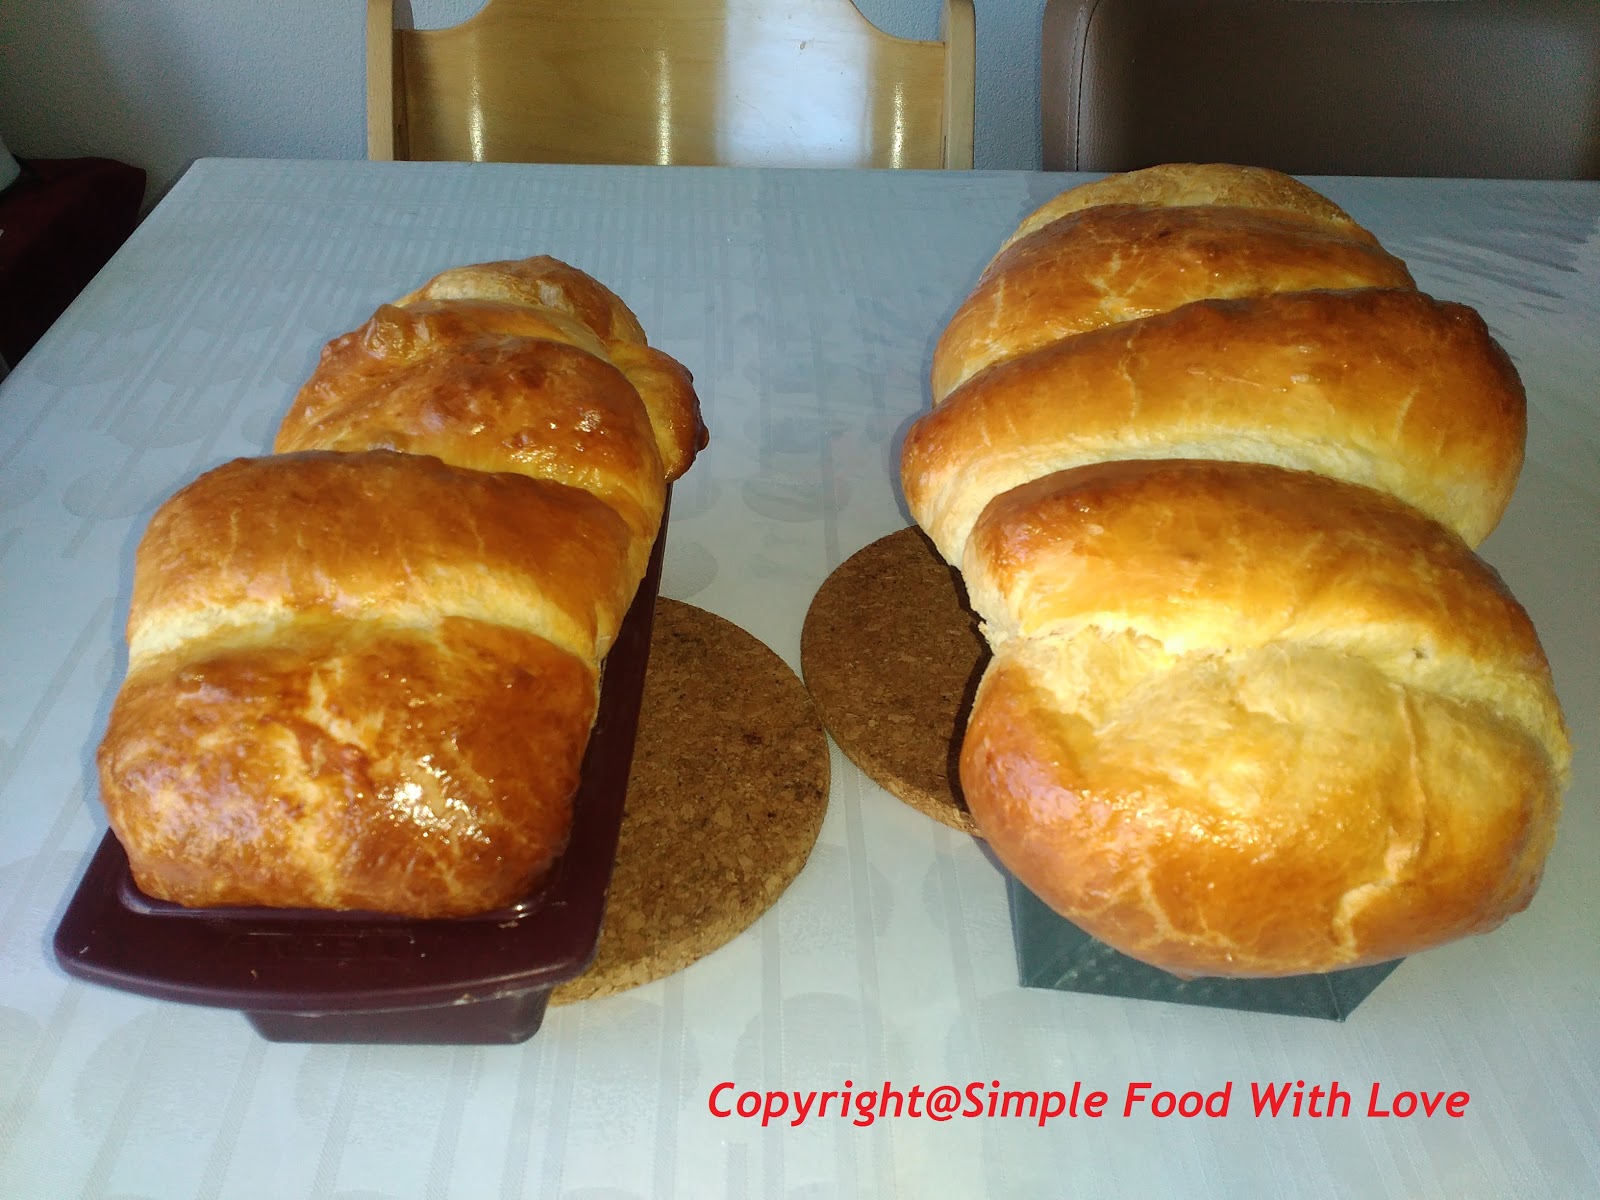
I tried to incorporate the cream as replacement of tangzhong in my to-go filled bread recipe. The result was satisfying. It was soft and as airy as the one using tangzhong. The advantage of using cream is that we do not have to make the tangzhong in advance. But, of course the use of cream increases the content of fat in the bread. If you don't mind the fat content, you can use this recipe instead of the recipe with tangzhong method.

My family, who always acted as my tester, found this recipe was also a keeper. 

For the filling, you can also refer to my previous recipe hier.


Ingredients:

125 grams fresh cream
250 ml milk
1 egg
500 grams bread flour
65 grams sugar 
7 grams yeast
50 grams butter

1 egg for brushing the bread
roasted black sesame seed


How to make:
  1. To make the dough, combine all dough ingredient (note: this can be done because the yeast used here is instant yeast) except the fresh cream and butter in the stand mixer bowl.  Using the hook attachment, knead the ingredients until you get a dough form and the gluten begins to develop.
  2. Knead in the cream and butter until the dough is smooth and does not stick to the wall of the bowl and to your hand. To double check if the gluten has developed enough, you can stretch the dough. If the dough can be stretched easily to form a thin membrane, and you can light through the membrane, then the dough is ready.
  3. Shape the dough into a ball shape. Put it back into the bowl, cover with cling film (plastic wrap) and place it in the refrigerator to proof until the next day or put it somewhere warm until it's doubled in size. As an alternative, proof it in a warm environment (the best is 28 degree Celcius) for 1 hour, or until it's doubled in size.
  4. After the dough rise double in size, punch down the dough and roll into a long shape. Cut into 16 equal size pieces (around 55-60 grams per piece).
  5. Roll the dough into a thin layer and fill in the dough with filling. 
  6. Cover the filling with the dough and pinch the edges and press it to make sure that the filling will not leak out.
  7. Carefully pinch up the edges and press together, ensuring the filling is well sealed.
  8. Place the pressed side down onto the baking trays lined with baking paper. Cover them with damp tea towel and let them rest for around 1 hour for last proving. (I sometimes use cling wrap to cover them and keep them in a warm cabinet. At least that method works for me).
  9. Preheat oven to 180°C.
  10. Brush the top of the bread with beaten egg, sprinkle the bread with roasted black sesame seed and bake in the oven for 25-30 minutes or until golden brown. I usually bake two trays with upper and below heat sources and exchange the positions of the trays halfway the baking time.


Sunday, October 4, 2015

Brioche Bread

My family loves this sweet bread. We usually buy it from a local supermarket near our house. The children love this bread. It is soft and sweet. Different than the normal bread used for sandwich lunch that the children usually bring to school.

A week ago, at request of husband, I tried a recipe I found in the internet. The recipe stated that the dough would be very soft and sticky because of the amount of the butter. However, this lead me to a very big mistake. I have already suspected something was not quite correct with the steps, since based on my previous experience with bread, I need to knead the bread until the gluten develops well.


My brioche bread tasted a bit floury, despites the 24 hours proofing time. It was very disappointing. The comment of my oldest child made me almost cry. "Mummy, this tastes bah". Oh dear.

That is why, 2 days after that, I found myself baked this bread again. This time, I adjust the steps and the amount of some ingredients according to my previous experiences with some bread recipes. 
The result is a very soft brioche bread, the softness feels like cotton in the mouth. BUT it is still not as sweet as our usual store-bought brioche. 

After I search the content of the ingredients of our store-bought brioche, I realized that their brioche contents at least twice as mush sugar as  mine. 

So, despite my second effort producing the cotton soft brioche, my oldest child still says, "Mummy this one is also not delicious".

Anyway, my youngest loves it, and my husband finished a big chunk of bread, eaten with a Cookie Notti spread, cappucino flavour. The bread also reminds me to my grandfather's fave, Roti Bluder. The texture is similar and also the taste. 

If your children love sweet, you may want to double the sugar in the recipe below. The time needed to make this is quite long, but it fits well with my schedule, since I bake only at night. Please feel free to comment, especially about the sugar content. I am curious on how much sugar is sweet enough, especially for the children sweet tooth.

Ingredients
500 grams white bread flour (high gluten flour)
7 grams instant yeast (my local brand yeast, suggests 7 grams for every 500 gr flour)
1 tsp salt
6 eggs (or 5 if you use bigger size eggs)
70 grams sugar
125 ml milk
250 grams butter (soft, room temperature)
1 egg, beaten for egg wash

Method
1. Place the flour in the bowl, sugar at one side of bowl, salt at one side of bowl and the instant yeast in the middle. Mix the dry ingredients well, you can immediately use the knead (hook) extension of your mixer.
2. After the dry ingredients well mixed, add the eggs and mix it well.
3. Add the milk and mix again the dough until the milk is good incorporated.
4. Cut the butter in cubes, and add them one by one into the bowl. Knead the dough until the gluten develops well. This is when the dough does not stick anymore to the side of the bowl. It is, however, a bit greasy compared to the dough of normal sandwich loaf, due to the high content of butter and eggs.You should be able to stretch the dough easily, although it will not form a relatively thinner membrane like the dough of sweet bread with water roux method. But it should be similar to that.
5. Remove the dough to a plastic bowl and cover it with cling film (plastic wrap). Store it in the refrigerator overnight, or around 24 hours to let it proof. By then, the volume of the dough should be at least twice.
6. After the dough rise double in size, punch down the dough and divide into several pieces, around 50-60 grams each. Place each portion parallel to each other in the loaf pan (remember to brush the pan with margarine/butter before filling the pan with the dough. I use two loaf pans, but you may also use 3 loaf pans.
7. Let the dough to raise again for around 2-3 hours, outside the refrigerator, at room temperature. Brush the top of the bread with the beaten egg.
8. Heat the oven, 180Celcius. I use lower heat. Bake the bread for around 30 minute or until the skewer inserted into the bread comes clean. I change to both lower and upper heat in the last 7 minutes to get a nice golden brown colour.  Let the bread cool on the rack before serving it.


Since I usually bake more than what we can finish in one sitting, I freeze half of the bread. We have tried the frozen bread. We took out the frozen bread and leave it at room temperature for a couple of hours. The bread is still soft and the texture is still good. It is delicious and the texture is still heavenly. I really wish that my children prefer less sweet food, one day.


Monday, March 9, 2015

Baked Bulgogi Pao

Instead of making steamed pao/bread, I decided to make experiment with my leftover bapao flour. Why? Because the idea of steaming a few batches of 4 steamed bread for 1.5 hour, exclusive the preparing and proofing time, is already killing me.

So, I am going to try baking it instead and I used the water roux method to make the dough. I managed to squeeze some baking time yesterday after we cycled to the city and back (it was around 16 km). As a note: the cycling was not my idea, it was my husband's idea. He said, the weather was very nice and after a few months of cold, wet and windy winter, it was time for us to go out and we did not have to think about paying the parking ticket. Yes, he was right about not having to pay the expensive parking ticket in the city center, however, how could I trapped by the idea of cycling for 16 km, after the day before we have cycled also for around 12 km to the market.

Anyway, I was glad that we have a kind of trailer that we can attached behind the bicycle so the children could sit there and if they fall asleep, I would not worry whether they sit safely on the bike or not.

After we arrived home, I prepared food for our dinner and squeezed in some time to prepare the dough. I was also baking a potato dish for the day after. To accelerate the proofing time, I put the dough in the oven for a while, while the oven is cooling down after I baked my potato dish. It worked great, the proofing was quite fast. But, be careful not to cook the bread in the hot oven.

For the filling, I used a ready to use bulgogi marinade. My husband loves the filling better than my usual BBQ pork filling. And the children finished their breakfast (and lunch) today. I am also happy that we have extra snack stock.

This is the recipe I used.

Ingredients
Filling
600 gr pork (I do not use lean pork, we love it a bit fatty, but not too fatty) - if you do not eat pork, change it with other meat
Bulgogi marinade
1 tbsp oyster sauce
1 tbsp soy sauce
pepper to taste
1/2 tsp 5 spice powder
a dash of sesame oil
1-2 tsp of corn starch
3 tbsp water

How to make the filling
1. Marinade the meat for a few hours and baked it for 30 minutes in the middle of the oven, 200Celcius.
2. Let it cool and cut the meat into small cubes.
3. Cook the meat again in a pan/wok, add the oyster sauce, soy sauce, 5-spice powder, pepper and sesame oil.s
4. Dilute the corn starch with the water and add into the pan.
5. Let it cool and keep it in the refrigerator while you prepare the dough.

Dough Ingredients
For the tangzhong (water roux) - Note: my grandmother called it "biang" in Indonesians
  • 50 g bread flour
  • 200 ml milk
For the bread dough
  • 125 ml milk
  • 7 gram instant yeast 
  • 65 g sugar
  • 450 g bread flour*
  • 1 teaspoon salt
  • 2 eggs, medium size 
  • all of the tangzhong (water roux) 
  • 50 g melted butter, cooled
To brush
  • 1 egg, beaten

Method
1. Prepare the tangzhong (water-roux), in advanced. Mix the bread flour and milk in a pan, until it is well mixed.
2. Cook the mixture over medium-low heat. Stir it constantly with a whisk or spatula until it becomes thicker. When you see lines behind the whisk or spatula trail, remove it from the heat.
3. Place the tangzhong in a small bowl and cover it with cling film (plastic wrap). The plastic wrap should stick directly onto the roux to prevent it from drying. Let it cool for a few hours or put it in the refrigerator until you are ready to make the dough.

4. To make the dough, combine all dough ingredient (note: this can be done because the yeast used here is instant yeast) except the butter in the stand mixer bowl. Add the tangzhong/water-roux into the bowl. Using the hook attachment, knead the ingredients until you get a dough form and the gluten begins to develop.
5. Knead in the butter until it the dough is smooth and does not stick to the wall of the bowl and to your hand. To double check if the gluten has developed enough, you can stretch the dough. If the dough can be stretched easily to form a thin membrane, and you can light through the membrane, then the dough is ready.
6. Shape the dought into a ball shape and lightly oil the dough (I usually forget to oil it and it still works good for me). Put it back into the bowl, cover with cling film (plastic wrap) and place it in the refrigerator to proof until the next day or put it somewhere warm until it's doubled in size. As an alternative, proof it in a warm environment (the best is 28 degree Celcius) for 1 hour, or until it's doubled in size.


7. After the dough rise double in size, punch down the dough and roll into a long shape. Cut into 16 equal size pieces (around 55-60 grams per piece).

8. Roll the dough into a thin layer and fill in the dough with filling. 
9. Cover the filling with the dough and pinch the edges and press it to make sure that the filling will not leak out.

10. Carefully pinch up the edges and press together, ensuring the filling is well sealed.
11. Place the pressed side down onto the baking trays lined with baking paper. Cover them with damp tea towel and let them rest for around 1 hour for last proving. (I sometimes use cling wrap to cover them and keep them in a warm cabinet. At least that method works for me).

12. Preheat oven to 180°C.
13. Brush the top of the bread with beaten egg and bake in the oven for 25-30 minutes or until golden brown. I usually bake two trays with upper and below heat sources and exchange the positions of the trays halfway the baking time.


Sunday, November 16, 2014

Yam Sweet Potato Bread


One day, I saw a posting from a childhood friend of mine. She is a good baker and a very good cake decorator. We live thousands of kilometer from each other. Thanks to social media, we can still communicate to each other. She posted yam sweet potato bread photos and also gave me the recipe.

I really loved to try that because I baked bread frequently lately for my family. We went to the Asian shop where I could find frozen grated yam. Unfortunately, I cannot find purple sweet potato here. So, I did this with orange colour sweet potato.

I modified the recipe and this time I did not use water-roux method. The result is a big hit with the boys. They love it so much. This time, the bread will not last one week (I usually freeze some portion for later consumption).

Here is the recipe.

Ingredients
Bread ingredients:
100 gr steamed mashed sweet potato and purple yam (I used 50/50)
350 gr bread flour
2 eggs
30 gr sweet condensed milk
40 gr sugar
1/4 tsp salt
25 gr melted butter
2 tsp instant yeast
120 ml milk

Filling ingredients:
400 gr steamed mashed sweet potato and purple yam (I used 300/100)
35 gr melted butter
30 gr sugar
40 gr sweet condensed milk

1 egg, whisked

How to make
Filling:
Mixed all the ingredients until it is well mixed and set aside. Keep in the refrigerator until we are going to use it.

Bread:
1. Mix all ingredients, excepts butter and milk, and knead the dough.
2. Add the milk while kneading the dough.
3. Add butter.
4. Knead the dough until it is smooth and does not stick to the wall of the bowl or until it can be stretched to form a thin membrane. This dough may be a bit sticky compared to the normal bread dough because of the sweet potato content.
5. Shape the dough into a ball shape and put in the bowl. Cover the bowl with a cling film and place it in a warm place to proof the dough until it is at least twice as big as the initial ball shape dough.
6. Punch the dough and divide it into portions. I divided the dough into 50 grams portions because I made it for my children, easier for eating.
7. Roll the dough into a thin layer and fill it with one big table spoon of the filling. Cover the filling tightly. Do this for all portions.
8. Proof the bread again for around 30-60 minutes.
9. Preheat the oven 180 Celcius.
10. Brush the top of the bread with whisked egg and bake it for around 20-25 minutes or until it is golden brown.

Enjoy the bread.

The filling

Fresh from the oven


Friday, September 5, 2014

Filled Bread with Water-Roux Method

I always love Asian type of bread. It is soft and most of the time we can find it filled with different kinds of fillings, either sweet or savoury. I also love European bread, which is usually tougher outside but also soft inside.

It is quite difficult to find a good Asian bread here. Only a couple of stores sell Asian bread. In our city, where we live now, we can buy it from Asian store (in the refrigerator area), or in one of the restaurant near the Saturday open market at Woenselsemarkt. However, the last few times we bought the breads, my husband complained critized the bread that it was a bit on the dry side than it should be. He said, that we should not buy it as often as before and suggested me to make them myself.

It is not that I do not want to fullfilled his wish, but this is quite a chore for me. Remembering that I am also working 4 days a week and use 1 day to accompany the childrens. The older one is only going to school until midday that mamadag and the younger one does not go to the daycare that day.

However, in order to fullfilled the whole family request and craving for the Asian type filled bread, and since we planned to go to the Efteling (a Dutch popular theme park) on the 2nd of August 2014, I planned to make the bread ahead.

I used one night after the children went to bed to make the water-roux dough and keep it in the refrigerator. The next night I made the bread dough and proved the dough in the refrigerator overnight. And the last night before we went to the Efteling, I finish the bread. The breads were ready just before midnight and two of them were gone in a second.

For the bread recipe, I have tried some versions of recipe. This one is using water-roux. My grandmother always said that it was "biang" method since it is made using "biang" (water-roux). Biang is Indonesian word, I think. My grandmother used to make the bread without the wonder of the modern technology such as my high power Kenwood machine. I guess, she was a super woman. I have tried to make bread without an electronic standing mixer and have to beat the dough on the kitchen table very hard for a very long time. Luckily, my husband gave me a nice birthday present two years ago, a nice shiny industrious kitchen machine from Kenwood.

The recipe is adapted from Christine's recipe. However, since I could not do the whole process in one go, I looked to the blog of Linda. She has an amazing blog and she gave me the idea to divide the work in a few days. So, I can now do the bread making process during the evenings after the children go to bed.

For the filling of the breads, that we brought to the park, I bought 1 can of red bean paste (ready to use type - in a can) that is also used to fill other type of Asian snack and dessert. I also used sausages and banana-and-cheese filling. You can choose to use other fillings of your liking or your own creation.


Filled Asian Bread with – Tangzhong (water-roux) method
Makes around 16 breads
Ingredients

For the tangzhong (water roux) - Note: my grandmother called it "biang" in Indonesians
  • 25 g bread flour
  • 125 ml milk
For the bread dough
  • 125 ml milk
  • 6 gram instant yeast *I usually used all 7 gram yeast from an instant yeast package
  • 50 g sugar
  • 350 g bread flour*
  • 1 teaspoon salt
  • 1 or 2 eggs, depends on the size (around 56 gram), beaten
  • 1 tablespoon dried milk powder - optional *I usually never add this
  • all of the tangzhong (water roux) or around 120 g
  • 30 g melted butter, cooled
To brush
  • 1 egg, beaten

Method
1. Prepare the tangzhong (water-roux), in advanced. Mix the bread flour and milk in a pan, until it is well mixed.
2. Cook the mixture over medium-low heat. Stir it constantly with a whisk or spatula until it becomes thicker. When you see lines behind the whisk or spatula trail, remove it from the heat.
3. Place the tangzhong in a small bowl and cover it with cling film (plastic wrap). The plastic wrap should stick directly onto the roux to prevent it from drying. Let it cool for a few hours or put it in the refrigerator until you are ready to make the dough.

4. To make the dough, combine all dough ingredient (note: this can be done because the yeast used here is instant yeast) except the butter in the stand mixer bowl. Add the tangzhong/water-roux into the bowl. Using the hook attachment, knead the ingredients until you get a dough form and the gluten begins to develop.
5. Knead in the butter until it the dough is smooth and does not stick to the wall of the bowl and to your hand. To double check if the gluten has developed enough, you can stretch the dough. If the dough can be stretched easily to form a thin membrane, and you can light through the membrane, then the dough is ready.
6. Shape the dought into a ball shape and lightly oil the dough (I usually forget to oil it and it still works good for me). Put it back into the bowl, cover with cling film (plastic wrap) and place it in the refrigerator to proof until the next day or until it's doubled in size. As an alternative, proof it in a warm environment (the best is 28 degree Celcius) for 1 hour, or until it's doubled in size.


7. The next day (it was around 24 hours in my case, but sometimes 12 hours is also enough), take the dough out from the refrigerator and let it rest for 30 minutes (skip this step if you’ve done a warm prove instead of the refrigerator prove). Punch down the dough and roll into a long shape. Cut into 16 equal size pieces (around 43-47 grams per piece).


8. Roll the dough into a thin layer and fill in the dough with filling.
9. Cover the filling with the dough and pinch the edges and press it to make sure that the filling will not leak out.

10. Carefully pinch up the edges and press together, ensuring the filling is well sealed.
11. Place the pressed side down onto the baking trays lined with baking paper. Cover them with damp tea towel and let them rest for around 1 hour for last proving. (I sometimes use cling wrap to cover them and keep them in a warm cabinet. At least that method works for me).

12. Preheat oven to 180°C.
13. Brush the top of the bread with beaten egg and bake in the oven for 25-30 minutes or until golden brown. I usually bake two trays with upper and below heat sources and exchange the positions of the trays halfway the baking time.


My husband and children love these little breads. The red bean paste filling is not the favorite of the children, however. But they love the banana-cheese and BBQ pork (char siu) fillings. Next time I will post the BBQ pork filling bread.


The trip to the Efteling was fun. We loved it and we even stayed there until almost 10PM. It was summer anyway and the children spent a couple hours nap time on the bycicle cart that we brought along. We ate the breads for our lunch and snack, but we decided to try the pasta bought in one of the restaurants in the park. Patrick (our oldest) could even finish 1 plate of pasta (he even hijacked mine). However, Timothy spent more nap time and woke up for a sausage bread (but this one was bought in the park). But, after that he was very excited to take pictures with the fairies.


With this success, I am determine to make my own bread more often for the children lunch.