Recipe Index

Wednesday, April 3, 2024

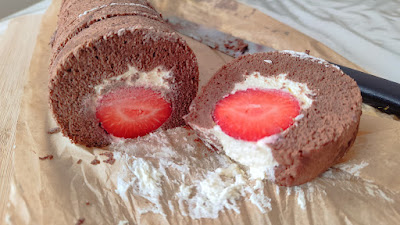
Chocolate Swiss Roll Cake with Fresh Whipped Cream and Strawberry Filling

Swiss roll cake is always one of our family favorites. I usually try, if I have enough time to prepare, to make cake for a birthday celebration in our house. This year, my youngest requested for a Swiss roll cake for his birthday. He requested for a coffee roll cake and other variant of roll cake. However, since his birthday this year fell on the busy period of Easter celebration, and also an appointment with family friends, I negotiated with him to make 2 chocolate Swiss roll cake filled with fresh whipped cream and fresh strawberries.

At the beginning, he was dissapointed. However, when the cake was being made, he started to get enthusiastic and started to help around with the cake. And when we could cut and try the cake, he was completely happy. I was also happy with the results. 

Let's get directly to the recipe of the cake, so you can try to make it at home. 


Ingredients

(A)

4 egg yolks
20 gr fine sugar
25 gr vegetable oil
50 gr milk
50 gr cake flour

(B)

4 egg whites
0.5 teaspoon cream of tartar
45 gr fine sugar

Ingredients of the Filling
300 ml cream (minimum 35%, the one we use for making whipped cream)
20 gram powder sugar
Fresh strawberry - washed and dried with paper napkin


How to make the cake:
1. Preparation: Line the pan with baking sheet. Make sure the baking sheet is bigger than the baking pan/tray, so that we can take out the cake easier. This time, I used a rectangular tray from IKEA. 

2. Mix all (A) ingredients except the flour. Sift the cake flour in, and mix it until it reaches smooth consistency. Put aside.

3. In another bowl, mix the egg whites until it is frothy. Add the cream of tartar and sugar, mix until it becomes soft peak.

4. In the mean time, preheat the oven, upper-and-lower heat at 160 degree Celcius.

5. Mix briefly the egg-flour mixture (A) to make sure that it is still smooth. Fold in 1/3 of the egg whites mixture (B) into the egg-flour mixture (A). After it is well incoporated, add every time 1/3 of the egg whites mixture (A) into the mixture gradually and fold it in well. Make sure that the (A) and (B) are fully incorporated.

6. Pour the mixture into the cake pan lined with baking paper and use the spatula to spread the mixture evenly. Note that the mixture is not really flowing, so you have to help the mixture to spread itself evenly.

7. Bake the cake at 160 degree Celcius, for around 20 minutes or until the tooth pick test comes out clean.

8. Let it cool in the oven with the oven door a little bit open for around 5 minutes.

9. Take the cake out of the pan and let it cool further on the cake rack. When it is still warm but cool enough to touch, roll the cake and let it sit in a roll shape. 

10. When the cake is already cool, unroll it, spread the cream filling (see below on how to make it) and then add 1 line of strawberries. 

11. Roll the cake and wrap it with the baking paper. Store it in the refrigerator for at least 1 hour before serving it, to make sure that the shape will hold.


How to make the filling:
Beat the fresh whipped cream and powder sugar until they are incorporated and forming a smooth whipped cream consistency.


Enjoy the cake!

Chocolate Swiss Roll Cake with Fresh Whipped Cream and Strawberry Filling


Friday, April 14, 2023

Durian Mille Crepe


During my husband's birthday gathering last year, my youngest son and I planned a different "cake". We usually baked either Lapis Surabaya cake (spiku) or Japanese cheese cake. But this time, inspired by the Durian Mille crepe that our aunt bought for us during our visit to her warm home in LA, USA, we exchanged our usual cakes with this one. 

My sons love durian. While some hate the taste or sometimes even only the smell of durian, my children love durian. When they were younger, they also hated it. It smells, mommy. However, after a visit to Medan (a city in Indonesia), where they got their share of tasty local durian, they started to love it. My youngest favorite is when the durian is processed into other delicious food, such as, mille crepe or just a simple durian ice dessert (Ice durian with crushed ice and flavored condensed milk).

This time, I made two durian crepe using the below recipe. I made it into two smaller size because it is easier to handle than bigger diameter crepe. Also, with the heavy durian filling, I think smaller size crepe is already filling enough for a portion of dessert.

For the durian, I used durian Palu. Frozen of course, because I could not find a cheaper fresh one here with guaranteed quality. But durian Palu is delicious and in this case, I would mix it with fresh whipped cream.

We have had quite a feast with this durian dessert during the gathering and I was happy with the happy faces after they ate the dessert.   


Ingredients of the Crepe
75 gr butter (melted)
200 gr all-purpose flour
6 eggs
800 ml warm milk (I used pasteurized full milk - be careful not to use hot milk since it will cook the eggs)
80 grams of sugar (around 6 tbsp sugar - for less sweet crepe)
1 pinch of salt

Method (Crepe)

1. Mix the flour, eggs, sugar and the salt in a bowl.
2. Warm the butter and milk. Put aside when it starts steaming.
3. Slowly add the milk mixture into the egg mixture while keep mixing the batter.
4. Keep the mixture in the refrigerator for a few hours. (I left it overnight, to divide my work load.)
5. Prepare 2 non-stick frying pans (I used two small non-stick pans, one is a bit bigger than the other). Heat the smaller pan and add a bit of butter. Melt the butter and spread the butter evenly.
6. Using a soup ladle pour 1 portion of the mixture to the pan and swirl the pan a few times to ensure that the mixture is spread evenly. Cook until the upper side of the crepe is not wet anymore and the colour change to light brown.
7. Slowly flip the crepe into the other (bigger) pan. This is the trick I used, so I do not have to flip it using spatula. Cook the other side for around 10 seconds, than flip it again to a tray lined with baking paper for cooling.
8. repeat steps 5-7 until all mixture is finished. I made around 40-50 crepes from the batter.
11. Let all crepes cool before arranging the crepes.


Ingredients of the Cream
900 ml fresh whipped cream + 3 tbsp sugar
300-500 grams durian without seed

Method (Cream)

1. Beat the durian until it becomes soft, put aside.
2. Beat the fresh whipped cream and sugar until it becomes fluffy. Tips: Remember the whipped cream has to be cold and also the mixer should not be warm.
3. Add the durian into the whipped cream and fold it.


How to arrange: 
Additional ingredient: Ready to use Azuki bean paste (red bean paste)

1. Prepare a big plate covered by baking paper.
2. Put 1 crepe on the plate.
3. Spread a part of durian whipped cream sporadically.
4. Cover with 1 crepe.
5. Read steps 3 and 4 until the last crepe.


Enjoy the durian mille crepe!


Thursday, October 13, 2022

Pandan Chiffon Cake

One of our favorite cake is pandan chiffon cake. I have difficulty to make a good pandan chiffon cake. Despites my effort to do some trial and error or trying out several recipes, it seems that my pandan chiffon cake was always somehow shrink or not big enough for my cake form.

Some time ago, I posted about how I tried to modify the recipe using design of experiment (DOE) principles by changing 2 different variables. After some trials, I seems to get the correct amount to fill in my cake form. So this time, I got a big enough cake compared to my cake form. 

For the cooling of the cake, I made use of a bottle and a couple of mugs. The bottle was used to hang the cake form upside down, while the mugs were used to hold the sides of the cake form, just as an extra support. After the cake was cool enough, I turned the cake form back.

Luckily this time, the cake turned out quite nice. The texture was soft, airy and the shrinkage was also minimal. I was quite happy with the results. I  used no fan-forced method when I put the cake batter in the oven. 

As usual, despites the imperfectness, we still enjoyed this cake.

Ingredients:
A
9 egg yolks
25 grams fine granulated sugar
180 grams cake flour
1/2 tsp salt
100 ml vegetable oil
150 ml coconut milk
a few drops of pandan paste (you can also use fresh pandan leaves - obtain first the juice to use)

B
9 egg whites
100 grams fine granulated sugar
1 tsp cream of tartar or 1 tbsp lemon juice


How to make:
  1. Shift the flour. Put aside.
  2. Mix the ingredients (A) except the dry ingredients and pandan paste until it mixed well.
  3. Add the dry ingredients step-by-step while mixing the ingredients. After all the dry ingredients are mixed add the pandan paste, mix everything until it reaches smooth consistency. Put aside the egg-flour mixture.
  4. In another bowl, mix (ingredients B) the egg whites until it is frothy. Add the cream of tartar and sugar until it becomes medium peak (peaks hold their shape pretty well, except that the tip of the peak curls over on itself when the beaters are lifted).
  5. Mix briefly the egg-flour mixture (A) to make sure that it is still smooth. Fold in the egg-flour mixture into the egg whites mixture (B) in three batches. Make sure that the (A) and (B) are fully incorporated.
  6. Preheat the oven (160 degree Celcius). I used fan forced to preheat the oven but switch to lower heat only when baking the cake.
  7. Pour the mixture into a chiffon cake pan (I used 25 cm cake pan). Baked the cake using lower heat (160 degree Celcius) for around 30 minutes and then switch to upper and lower heat for the last 20 minutes to get a nice brown surface. 
  8. Do a prick test, by pricking a satay stick into the middle of the cake. If it is still wet, bake it a bit longer.
  9. When it is done, turn off the oven. Let it cool down in the oven for around 5 minutes. 
  10. Remove the cake pan from the oven, invert it upside down using bottle to hold the center of the cake pan. Or you can also use mugs to support the sides of the cake pan, while inverting it and during the cooling down.
  11. After the cake is cooled, remove the cake from the cake pan. Serve the cake. 


Friday, November 19, 2021

Pork Bread with Fresh Cream

Having lived most of my early life in South East Asia, I was pampered with varieties of good food. One of my favorite snacks is Asian type sweet soft bread filled with varieties of filling. The filling can be sweet or salty. 

One of my sweet childhood memories is when my parents brought me to buy baked filled bread from Teck Kee Tanglin Pau. I loved the smell of the freshly baked bread, the taste of sweet meat filling of the bread and the trips to the shop with my parents. 

Although we lived in other continent now, we also introduce our kids to varieties of food, including Asian food and snacks. The baked bread filled with sweet meat has also become one of the children favorite snacks or to-go-lunch options. I sometimes fill their lunch box with this type of bread. 

Usually, I used tangzhong bread recipe to make this bread. However, I felt that it was sometimes quite troublesome to prepare the tangzhong in advance. Therefore, I searched the internet for the possible replacement for the tangzhong. An idea for that is using either sour cream or fresh cream with minimal 25% fat content. I saw some bread recipe in the internet using either sour cream or other thick cream.

I tried to incorporate the cream as replacement of tangzhong in my to-go filled bread recipe. The result was satisfying. It was soft and as airy as the one using tangzhong. The advantage of using cream is that we do not have to make the tangzhong in advance. But, of course the use of cream increases the content of fat in the bread. If you don't mind the fat content, you can use this recipe instead of the recipe with tangzhong method.

My family, who always acted as my tester, found this recipe was also a keeper. 

For the filling, you can also refer to my previous recipe hier.


Ingredients:

125 grams fresh cream
250 ml milk
1 egg
500 grams bread flour
65 grams sugar 
7 grams yeast
50 grams butter

1 egg for brushing the bread
roasted black sesame seed


How to make:
  1. To make the dough, combine all dough ingredient (note: this can be done because the yeast used here is instant yeast) except the fresh cream and butter in the stand mixer bowl.  Using the hook attachment, knead the ingredients until you get a dough form and the gluten begins to develop.
  2. Knead in the cream and butter until the dough is smooth and does not stick to the wall of the bowl and to your hand. To double check if the gluten has developed enough, you can stretch the dough. If the dough can be stretched easily to form a thin membrane, and you can light through the membrane, then the dough is ready.
  3. Shape the dough into a ball shape. Put it back into the bowl, cover with cling film (plastic wrap) and place it in the refrigerator to proof until the next day or put it somewhere warm until it's doubled in size. As an alternative, proof it in a warm environment (the best is 28 degree Celcius) for 1 hour, or until it's doubled in size.
  4. After the dough rise double in size, punch down the dough and roll into a long shape. Cut into 16 equal size pieces (around 55-60 grams per piece).
  5. Roll the dough into a thin layer and fill in the dough with filling. 
  6. Cover the filling with the dough and pinch the edges and press it to make sure that the filling will not leak out.
  7. Carefully pinch up the edges and press together, ensuring the filling is well sealed.
  8. Place the pressed side down onto the baking trays lined with baking paper. Cover them with damp tea towel and let them rest for around 1 hour for last proving. (I sometimes use cling wrap to cover them and keep them in a warm cabinet. At least that method works for me).
  9. Preheat oven to 180°C.
  10. Brush the top of the bread with beaten egg, sprinkle the bread with roasted black sesame seed and bake in the oven for 25-30 minutes or until golden brown. I usually bake two trays with upper and below heat sources and exchange the positions of the trays halfway the baking time.


Wednesday, January 27, 2021

Chocolate Chiffon Cake

One of our favorite cake is pandan chiffon cake. I have difficulty to make a good pandan chiffon cake. Despites my effort to do some trial and error or trying out several recipes, it seems that my pandan chiffon cake was always somehow shrink. 

A few weeks ago, I discussed this with an old school friend. She gave me idea to let the cake cool in the oven instead of letting it cool outside the oven. 

So, this time I tried a modified recipe while also cooling the cake in the oven. I know, I know. According to design of experiment (DOE) principles, it was a wrong thing to do: Changing 2 different variables at a time without making the DOE table first. I am lazy, hahaha.... Anyway, I did modify the recipe because my cake pan was actually bigger than the recipes I had. 

The chiffon cake I made this time is not our usual pandan chiffon cake but chocolate chiffon cake. I seldom made chocolate cake since I found that chocolate cake, in general, is difficult to handle. It tends to be wetter (literally) than vanilla or pandan cake. And usually it is quite sticky, difficult to roll (in the case of roll cake). This time I encouraged myself to make the chocolate variant because my husband asked for chocolate instead of pandan.

Luckily this time, the cake turned out quite nice. The texture was soft and the shrinkage was also minimal. I was quite happy with the results. What I think I need to improve next is minimizing the crack at the surface of the cake. I have decreased the oven temperature and also used no fan-forced method, but the cake still had cracks at the surface. 

Despites the imperfectness, we still enjoyed this cake.

Ingredients:
A
8 egg yolks
20 grams fine granulated sugar
40 grams chocolate powder (without sugar)
150 grams cake flour
1/2 tsp salt
100 ml vegetable oil
150 ml milk

B
8 egg whites
100 grams fine granulated sugar
1 tsp cream of tartar or 1 tbsp lemon juice


How to make:
  1. Shift the flour and chocolate powder. Put aside.
  2. Mix the ingredients (A) except the dry ingredients until it mixed well.
  3. Add the dry ingredients step-by-step while mixing the ingredients. After all the dry ingredients are mixed, mix everything until it reaches smooth consistency. Put aside the egg-flour mixture.
  4. In another bowl, mix (ingredients B) the egg whites until it is frothy. Add the cream of tartar and sugar until it becomes medium peak (peaks hold their shape pretty well, except that the tip of the peak curls over on itself when the beaters are lifted).
  5. Mix briefly the egg-flour mixture (A) to make sure that it is still smooth. Fold in the egg-flour mixture into the egg whites mixture (B) in three batches. Make sure that the (A) and (B) are fully incorporated.
  6. Preheat the oven (150/160 degree Celcius). I used fan forced to preheat the oven but switch to lower heat when baking the cake.
  7. Pour the mixture into a chiffon cake pan (I used 25 cm cake pan). Baked the cake using lower heat (150 degree Celcius) for around 30 minutes and then switch to upper and lower heat for the last 20 minutes. 
  8. Do a prick test, by pricking a satay stick into the middle of the cake. If it is still wet, bake it a bit longer.
  9. When it is done, turn off the oven. Invert the cake pan inside the oven. Let it cool down in the oven. 
  10. Remove the cake from the oven and from the cake pan. Serve the cake.


Chocolate chiffon cake - just out from the oven


Chocolate chiffon cake - ready to serve


Monday, August 31, 2020

Aubergine in Garlic Sauce

My children love having aubergine dishes. I also find it delicious as Indonesian dish, e.g. cooked as lodeh. However, the kids usually ask for aubergine in balado sauce (cooked in Indonesian tomato sauce with a tint of chili). I also find it delicious but too tedious to cook. It is because we need to fry the aubergine first. 

Another favorite style of cooking aubergine for us, is aubergine in (spicy) garlic sauce. I usually buy the instant sauce (Singapore brand) to make it. This aubergine dish also needs us to fry the aubergine first before making the sauce. 

Last week, I wanted to cook aubergine we had but I did not have other ingredients either for aubergine balado or lodeh. After browsing for the possible alternatives, I decided to try making the non-spicy variant of the aubergine in garlic sauce. I did not have the instant sauce, but I had the ingredients to make the sauce.

It turned out to be quite nice and the whole family loved it. Although it still involved frying, I found this dish quite refreshing. I did plan to slowly add some chili so that my children can learn to appreciate spicy food also.

Below is the recipe of this dish.


Ingredients:
1 aubergine, cut into medium strips
oil to fry
corn flour
2 stalks spring onion, cut into small pieces
6-7 cloves garlic, minced
1 cm ginger, minced
3 tbsp (light) soy sauce
1 tbsp black vinegar
1 tsp white pepper
1-2 tsp white sugar

How to:
  1. Dust the aubergine strips in corn flour, put aside.
  2. Heat the oil. Not too much, just enough to fry the aubergine, but not deep frying it. Fry one side for around 3 minutes or until it is brown. Then, fry the other side also until it is brown. Drain the excess oil and put aside.
  3. Heat 1 tbsp of oil. Brown the minced garlic for 1 minute.
  4. Add the minced ginger until fragrant.
  5. Add the aubergine.
  6. Add the soy sauce, black vinegar. Mix until the soy sauce and vinegar well incorporated with the aubergine.
  7. Add a bit of pepper and sprinkle the sugar on the aubergine. Mix them well.
  8. Add the spring onion.
  9. Add a bit of chili powder or cut chili if you want something spicy.
  10. Taste it. If needed adjust the taste with salt/pepper/sugar. 
  11.  Serve the dish with warm steamed rice.

Enjoy it with warm steamed rice.


Wednesday, July 1, 2020

Cheesecake Brownies

Chocolate cake is one of everybody's fave. OK, almost everybody.

I usually bought either supermarket or bakery brownies since it is convenient. But, having 2 young boys who start to appreciate the difference of ingredients' quality, I looked to some alternatives. I was actually quite amazed, how they could detect which brand of ingredients I used for some cases. So, for certain ingredients, when possible, I bought the higher quality ones to avoid arguments with these young boys at home.

Not long ago, I saw a cheesecake brownies recipe from Sara (www.dinneratthezoo.com) and thought that it looked good. Accidentally, a few days after that, a friend of mine made her cheesecake brownies using Sara's recipe. Based on my friend's comment, I was motivated to find a time to try the recipe out. Especially since I needed to provide more snacks for the boys during that (Covid-19) lockdown period. 

Since I used different size of baking pan than Sara's and some of the ingredients were not quite easy to find here, I modified her recipe a bit to cater to our situation. The recipe is easy to follow and the result is also delicious. It was quite a heavy cake, so I cut the cake into 16 squares. The baking pan I used was the baking pan for the Lapis Surabaya cake 22 x 22 x 4 cm. 

Ingredients:
Brownies layer 
170 gr butter
125 gr dark cooking chocolate (I used 74% choc content)
150 gr fine sugar
3 eggs (medium size)
2 tsp vanilla
125 gr all-purpose flour
4 tbs cocoa powder 
1/4 tsp salt
1 tbs of hot water

Cheesecake layer
300 gr cream cheese
50 gr fine sugar
1 egg
1/2 tsp vanilla


How to make:
Brownies batter
  1. Melt the butter and the dark cooking chocolate. It can be microwaved at 800 Watt for 30 sec (you may sometimes need longer) and stir the mixture until smooth. Or alternatively melt it using double boiler. Let it cool.
  2. After the chocolate mixture is cool enough, add sugar, eggs, and vanilla, mix until the ingredients are incorporated.
  3. Add the flour, cocoa powder, salt, and mix until it is well combined.
  4. Put aside 1/4 of the brownies batter (for the decoration).
Cheesecake batter
  1. In a bowl, mix the cream cheese and sugar. Beat it for a couple of minutes before adding the egg and vanilla. Mix again until it is well combined and smooth.
Baking the cake:
  1. Preheat the oven at 180°C using upper and bottom heat.
  2. Prepare the cake pan, line the bottom and sides with baking paper. 
  3. Pour 3/4 of the brownies batter into the baking pan, level the batter.
  4. Pour the cheesecake batter on top of the brownies batter.
  5. Mix the brownies batter (1/4 of the batter) that we put aside with 1 tbs of hot water, mix to get a smooth mixture. Spoon this on top of the cheesecake layer.
  6. Using skewer or a knife or fork (whatever you can find), make a pattern for a decoration purpose.
  7. Baked the cake for around 30-35 minute or until the do the prick test, by pricking a skewer into the middle of the cake. If it is still wet, bake it a bit longer.
  8. Let it cool before cutting the cake.


If you do not want to finish everything at once, you can freeze the cut cakes. Leave it in room temperature for a few hours before serving it or alternatively you can microwave it if you prefer a warm cake.
Enjoy the cake!